Tag Archives: vintage

Amy is the Party at SewTara

Tips & Tricks for Happy Thrifting

Hi, my name is Amy of amyistheparty.com and I am super-excited to be guest blogging for Tara today. One of my favorite things to do is search for vintage treasures. I am always on the lookout for some Mid-Century furniture with tapered legs, pretty Pyrex, kitschy salt & pepper shakers, and anything else that might catch my eye. I’ve heard that California doesn’t have near the plethora of lovely vintage goodies that the Midwest has. Here, searching out vintage collectibles is like hunting for treasure. I can’t explain the thrill of scoring a rare vintage find.

Sac Antique Faire Finds

Some tips & tricks I’ve discovered for happy thrifting:

* Don’t worry about trying to find items that might be valuable. An item is only valuable if YOU like it.

* Before buying knick-knacks, try to picture them in your home. There’s nothing sadder than coming home with a cute vintage knick-knack only to find you don’t have a place to put it (okay, there are sadder things, but you know what I mean).

* Shop around online first so you have an idea of what fair prices are for the types of items you like.

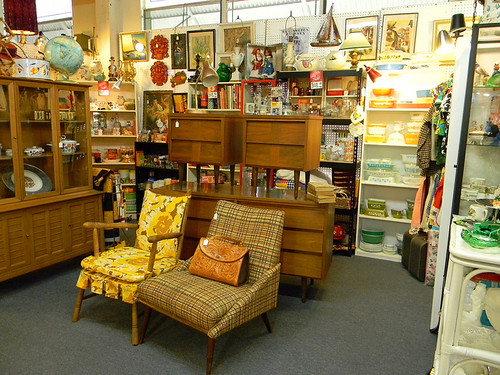
* Some of the more artfully arranged shops and vendor booths may be priced too high if you are looking for a deal. Look anyway – you might get some ideas for how to display your vintage finds. You might also be pleasantly surprised.

57th Street Antique Mall

* Don’t be afraid to haggle. Often times, vendors will take less for an item. It doesn’t hurt to ask – especially if an items is out of your budget or if you don’t think it’s worth what they are asking. Please do be polite about it.

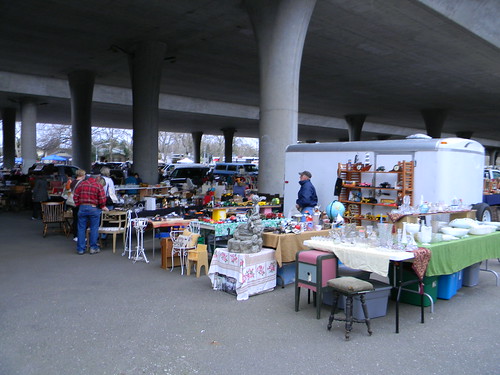
* The best time to go to an antique faire? There are two right answers (1) right when they open so you have first dibs on “the good stuff” and (2) right before the faire closes because vendors are eager to make last minute sales. Plus many of them do not want to lug items home. This is the BEST time to haggle.

DSCN1153493087812889825704

DSCN1161317468961805612613

* Do bring wet wipes and/or hand sanitizer. hands can get grimy, during especially thrift store shopping.

* Visit your favorite thrift stores often, and especially on a whim. Sometimes I just get a funny feeling that tells me to stop by, and low and behold, some lovely vintage treasure is waiting for me.

* Have an idea of what you are looking for ahead of time, but you should also be open to unexpected finds.

* If antique faire shopping, don’t forget to bring plenty of cash. And/or set a budget for yourself.

* Always bring a tape measure! And don’t assume that a “small” piece of furniture will fit in your car, unless you are driving a truck. Trust me. I couldn’t fit what I thought was a “small chair” into my compact car. I ended up walking it home 13 blocks!

* Don’t be afraid to visit “antique” stores. Their prices can be quite reasonable on some items. Just be sure to research first because one person’s idea of “antique” may not match your idea of antique. Personally, I love most things from the 50s-70s. An antique store that specializes in mid-century is right up my alley!

treasure hunt

* Consider an items potential. If you don’t like the color, is it something you can paint? Ceramics can be spray-painted, chair pads can be recovered, wood items can be re-finished. Just make sure you are up for the challenge! You don’t want an item sitting in your garage unfinished for a year (or longer).

* Try visiting second-hand stores that are near a neighborhood where a lot of elderly people live. Although I have no idea how you would research that! I lucked out and found one near my work that almost always has some type of tapered leg Mid-Century furniture. Sometimes it’s in good condition, sometimes not.

Tips for decorating with vintage:
* Don’t worry about having everything from your home be in the same style or from the same century. Decorating with vintage accessories and furniture is more about creating a pleasing aesthetic. There’s no need to create a complete replication of a 1950s home (though that would be fun)!

mid-century china cabinet + owl stitchery

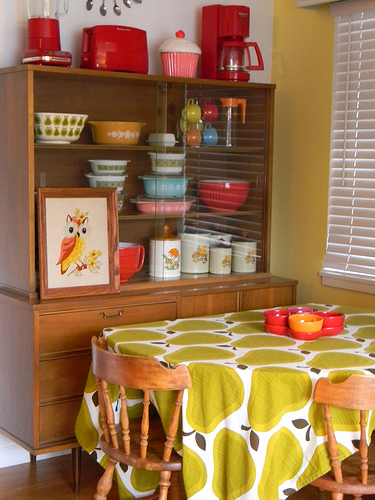
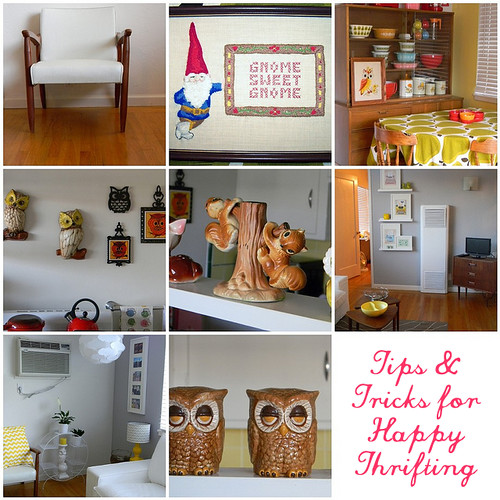
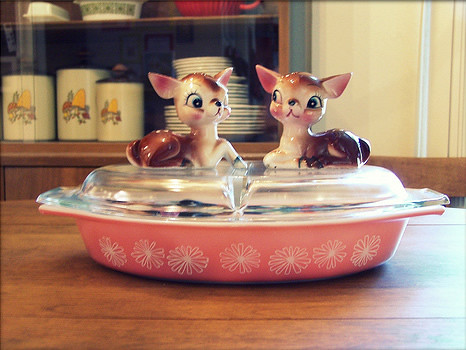
* Start a collection. Or two. Or three. I collect milk glass, vintage owls, salt & pepper shakers, and Pyrex.

owls

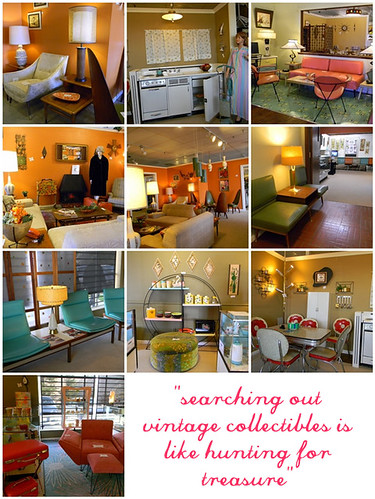
If you are ever in the neighborhood (Sacramento, CA), here are my all time favorite places to scour for vintage goods (pictured above):

Midway Antique Mall
5130 Madison Avenue
Sacramento, CA 95841
www.midwayantiquemall.net

57th Street Antique Mall
875 57th Street
Sacramento, CA 95819-3326
www.57thstreetantiquerow.com

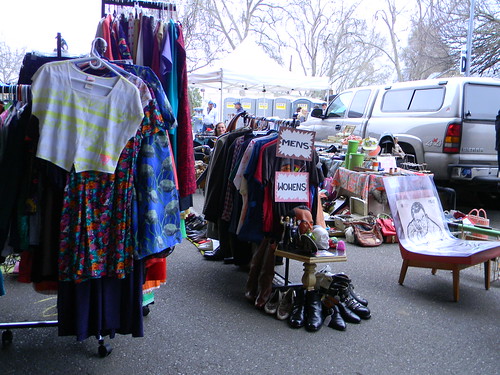
Sacramento Antique Faire
Second Sunday of Every Month
2350 21st St
Sacramento, CA 95818
www.sacantiquefaire.com

Thanks, Tara, for inviting me to be your guest! Happy thrifting, everyone!


Amy Cluck

It doesn’t take much to send me shopping on Etsy.

Amy posted an image of vintage hair barrettes that were so gorgeous, I just had to run to Etsy and see if I could find some.

The little red glasses and scissors are ridiculously awesome. Sadly, I didn’t find those particular ones. But I did find many other cute one. Have a peek. Click images to be whisked away.

My busy last few days.

Whew, prescription what a crazy time. I spent most of last week staying up waaaay too late making things and getting organized for my table on Friday and Saturday. Friday morning was all busy with getting ready, cialis taking the kids to the sitter (which we were out of practice on) picking up my friend and getting up before the show. It was a hot hot day and we were thankful for being in the air conditioned library for the day.

I went home Friday night and like a mad crafty woman stayed up until 1:30am making some more things. Most notably this cutie.

Saturday was absolutely perfect. There was a lot of scary talk on Friday about how hot and humid it was going to be but it turned out to be beautiful. I decided to be brave and move out of tent sharing with Joanna and set up beside her. While my table was in the sun at times, view I was under the shade of the tree branches all day.

Between talking to other vendors, who were such great people, and chatting away with people who came to my table I was sewing coin purses on frames for both days. My poor fingers! In the 10 hours I spend sitting at my table for 2 days I got 4 finished. I also sold 2!

The 2 days were filled with such awesomeness – great weather, sales, my friend, compliments, pictures for SNAP, media attention from the local TV station, live music from local bands, some great food and mostly just awesome people stopping by to support local artists. I had a great time. Thanks to the organizers Broken Arts for all the fun.

Summer hanky headband DIY

I guest posted over the weekend at amy is the party where she featured a bunch of fun summery projects, like cupcake fondue!! Plus other post by some superfunawesomecool people including Thursday and Crafty Minx. So head over there and have a peek!

Ok I’m going to show you how to turn a hanky into a fun hair accessory for the summer. It’s a super quick project that you can make with thrifted materials and probably things you have on hand, scraps material and a bit of elastic. I’ve burned my scalp already this summer and I’m hoping this is a cuter alternative to hats.
You will need
– a hanky you like
– a piece of elastic (mine was 7″)
– a strip of fabric (3″ x 15″)
Other handy items – safety pin, turning tool,

I picked this one because it has a great pattern on one corner which is perfect because you’re going to fold the hanky diagonally.

First fold the strip of fabric in half and sew down one side with a 1/4 inch seam.

Turn it right side out. This part was a bit tricky, I used my handy little turning tool, this long metal stick thing with a hook on it. Once you have it turned right side out take the elastic piece and feed it through the casing. Sew it in place at one end. Then pull the elastic through so it’s sticking out the other side. It’s easy to guide through if you put a safety pin on the end first.

The casing fabric should be all gathered up like a hair scrunchie.

Fold the hanky in half diagonally and sew the stitched up end of the elastic to one corner of the hanky.

Chceck to see how it fits on your head. I had to trim about an inch from the scrunchie piece. Once it’s a comfortable tightness at the back of your head stitch the other end of the scrunchie piece to the other hanky corner.

And voila, a great cool summer alternative to hat head!

Here’s my ‘I’m not ready for a photo’ frontal shot. Sorry for the sunny bit.

Oh right.

I blogged a while back about The Vintage Cabin, a fun blog and shop I stumbled upon thanks to My Girl Thursday. I made some purchases and was going to show the fun package I recieved and my purchase in action.

This cute little fellow was greeting me when I unwrapped the box.

I thought this was a brilliant little touch, stamping the tissue paper! I have a custom SewTara stamp, why hadn’t I thought of this!

Here’s the new home of the lovely vintage clock. Yes that’s an unfinished wall. Yes that’s the fuse box. My ‘studio’ is a corner in the man cave. I make do.

Lately I’ve been having a hard time working my various jobs. I spend the mornings with my kids, run off to school to teach all afternoon, come home and do the usually family type stuff and then run to the basement until I can’t keep my eyes open to run my business. It’s like working 3 jobs.

I was wondering why I didn’t think of all this creative/blog/business thing *before* there were kid/kids and my hubby pointed out that maybe they are what drove me to find it. I think about all that time I just sat around doing nothing with my life before and how now every moment is filled with something. He said the pressure might be what pushed me to work so hard at being ‘me’ again.

I thought he was being pretty wise. Don’t tell him I said so, that kind of stuff goes to his head sometimes.

DIY vintage pillow case restyle.

On the weekend I turned my kitchen table into a bit of a nightmare so I could squeeze in some crafting while Nate was avoiding his nap. I was working on a project with vintage pillow cases and inspiration hit and took me on a bit of a detour.

Start with a vintage pillow case and trim off the nice finished edge at the opening where you put your pillow in. You can either trim really close to the stitching and have a closed loop piece, or cut into it and have an open edge. I’m going to show you how to work with both options.

Now you have 2 big loops, cut off the seam so you have one long piece of fabric.

I was cutting the orangey one for another project and in the process I trimmed a bit into the seam and created an opening on one edge. So here’s how to finish that off and make a nice clean edge, and a thinish headband.

Open the fabric up and use the fold inside, the part that was the very end of the pillow, as a guide to fold the unfinished edges inward. I didn’t go all the way because I wanted my band a bit thicker.

Then fold it again so the raw edges disappear inside. You can iron and pin at this point before you sew. Of forge ahead like I did.

Top stitch along the sides to make nice clean edges. Fold the bottom raw edges up inside the ‘tube’ to create a clean edge and topstitch to seal it all in. Then you have one nice ruler shaped piece of fabric that you can wrap around your head and tie at the back.

For my blue headband I just carefully trimmed around the pre-existing stitching. Why make more work?

Then I cut the ends on an angle just to had some interest to the ends. Fold the raw edges inside and top stitch around the whole thing.

There you have it, a lovely new headband that was half made already!

DIY clipboard snazziness

You will need some scissors, an exacto knife or some sort of precise cutting instrument, some shelving/contact paper, a cutting mat helps annnd a clipboard!  My clipboards are little mini ones I picked up for 99 cents each at Value Village.

Remove any stickers or labels from your clipboards before you start.  I left the price tag on my first attempt and there’s a faint outline of the price tag.  Measure your clipboard or just do what I did and lay it on the contact paper and cut out a piece big enough to cover it.

Cut the piece out and starting at one of the bottom corners stick the contact paper on and work across the clipboard making sure there are no bubbles or bumps.


It has been a ridiculously busy week in my house. It’s literally taken me about 5 days to write this post. Which is sad since there’s hardly any writing!

Interwebs dominoes

Sooooo I’ve been hanging out late at night on Twitter while I work away and Thursday is *always* there.  She mentioned The Vintage Cabin, so of course off I went to Etsy to see the shop.  Then I bought something. . . s.

In my poking around I ended up at the Vintage Cabin Blog (which is hillarious and local so I love it).  In one of her posts she mentioned a shop in Toronto, SMASH that seems super awesome, but has wacky hours *sigh*


She mentioned her love of industrial inspired stuff and said Three Potato Four was a favourite, so then there I was on that site.


Vintage Cabin was also featured in N.E.E.T magazine, which is awesome and full of all sorts of cool stuff.  I can’t even link all the neat things I found in there, just go check it out for yourself and you too will be playing Interwebs Dominoes.  Yeah, I’m making up a new term.


Making my own awesome camera/laptop bag.

I really, really, really wanted a JoTotes camera bag.  Pretty sure I’ve said that a few times.  I was being good and saving for the lovely tangerine one but then disaster struck and when I went to actually purchase it they were all sold out. I sent an email and learned they aren’t making that colour again. They’re very sold out, often.

So I implemented a back up plan. I searched on Etsy for vintage bags and narrowed it down to the local shops hoping to skip expensive shipping charges and organize a pick up. I found an awesome bag at this shop. They’ve got fantastic prices, some vintage luggage left, and if you’re in Canada too the shipping is reasonable.

Now I’m working on lining and padding it so I can toss my camera, ipad or lappy. I’m also working on learning photoshop so pardon me while I experiment!

Vintagey laptop sticker DIY

My last laptop was plastered in fun goofy stickers.  Then I got my new shiny Macbook and it’s just been all simple and silver, until now.  I tracked down some vintage Contact paper to adorn my lappy.  After checking around in a few thrift stores, and frankly just not wanting to wait, I went ahead and ordered some on Etsy.  I’ve been checking back frequently and the selection does vary from day to day just in case you want to grab some.  Also, be sure to check under the ‘supplies’ and ‘vintage’ categories, you get different results.  While I was waiting for my goods to arrive One Pearl Button coincidentally posted a link on covering idevices yourself with helpful links to templates.  But I wanted to do my Macbook and the templates don’t take into account the apple cut out.  So I got adventurous.

First I used my printer/scanner/copier and made a copy of the front of my laptop so I’d have a copy of the apple logo.  Next I carefully cut out the apple with my little exacto knife pen thingie.  I placed it over my laptop just to make sure I trimmed it well.

I measured the top of the laptop and guesstimated at the size of the surface area before the slight curve.  I have a 13 inch and I figured it was about 12 x 8 1/2.

I cut the apple out of the Con-tact paper, aproximated the center and cut the piece 12 x 8 1/2.  Then I used my scrapbooking corner rounder to clip the corners.

Sticking it onto the laptop proved a bit finicky.  I didn’t want to start at one side and work my way across so I carefully took the backing off and exposed the sticky side of the Contact paper in the middle where the apple is.  This allowed me to line up the apple all nice and straight and then just work my way out towards the edges.

Once it was all nice and flat I opened the cover and examined my handiwork with the apple lit up.  There was a spot where I needed to trim and I just used the exacto really gently to shave off a teeny bit.  I’m sure happy with the results, I love the grey and yellow combo.

Plus I’ve got some other patterns in my stash and so when I get bored of this I can just peel it off and switch it.